Virtualization and Virtual Machines

MERN Stack Developer, Machine learning & Deep Learning
Virtualization is a cornerstone technology in the world of DevOps and cloud computing. It enables the creation of virtual versions of physical resources such as servers, storage, networks, and even entire data centers. By abstracting the physical hardware, virtualization allows multiple operating systems and applications to run on a single physical machine, improving resource utilization, scalability, and flexibility.
What is Virtualization?
Virtualization refers to the process of creating virtual instances of physical hardware or software resources. This abstraction is achieved using a hypervisor, a software layer that sits between the physical hardware and the virtual machines (VMs). Hypervisors allocate resources like CPU, memory, and storage to VMs while isolating them from one another.
Types of virtualization include:
Server Virtualization: Running multiple server instances on a single physical server.
Network Virtualization: Abstracting network resources into logical segments.
Storage Virtualization: Pooling multiple storage devices into a unified resource.
Desktop Virtualization: Enabling virtual desktops on various devices.
The Problem Before Virtualization
One service = One physical server (e.g., database or web server).
Over-provisioning of resources was common, leading to underutilization.
High capital and operational expenditures were necessary for hardware setup and maintenance.
The Rise of VMware and Virtual Machines
VMware introduced tools to enable virtualization, allowing:
Multiple operating systems to run on a single physical machine.
Isolation of services, reducing the risk of failures impacting other services.
How Virtualization Works
Physical Hardware: The base layer.
Hypervisor: A tool enabling virtualization by partitioning resources into virtual machines.
Virtual Machines (VMs): Independent "guest machines" with their own operating systems running on the hypervisor.
Types of Hypervisors
Type 1 (Bare Metal Hypervisor):
Runs directly on the physical hardware without an underlying operating system.
More efficient and commonly used in production environments.
Examples: VMware ESXi, Microsoft Hyper-V, Xen.
Type 2 (Hosted Hypervisor):
Runs on top of a host operating system.
Typically used for development, testing, and learning environments.
Easier to set up and manage on personal computers.
Examples: Oracle VM VirtualBox, VMware Workstation, Parallels Desktop.
Dual Boot Vs Virtual Box
Dual Boot Setup
Dual Boot refers to installing two operating systems on a single machine, allowing you to choose which one to run at startup.
Pros: You can use the full resources of your machine for each OS.
Cons: Requires rebooting to switch between systems, and each OS runs separately on the hardware.
VirtualBox
Oracle VM VirtualBox is a Type 2 hypervisor, running on top of a host operating system like Windows, macOS, or Linux.
Advantages:
Allows you to run multiple operating systems on a single computer without rebooting.
Ideal for creating virtual machines for testing or learning.
It’s open-source and supports various OSes like Linux, Windows, macOS, and more.
How it works: After installing VirtualBox, you can create virtual machines, install guest operating systems, and run them simultaneously alongside your main OS.
Creating Virtual Machines
There are two main ways to create VMs, each with its benefits. Whether you're looking to set up VMs manually or automate the process.
1. Manual VM Creation
In this method, you manually configure each step required to set up a Virtual Machine. This includes selecting various options to customize the VM and installing the operating system. While it might take a little more time compared to automation, it provides a deeper understanding of the underlying setup process.
Tools Needed:
Oracle VirtualBox: A hypervisor that will run your VMs.
ISO Files: You’ll need installation files for CentOS or Ubuntu Linux, which you’ll attach to the VM for installation.
Login Tools: Git Bash or Putty to manage and interact with the VM after installation.
Step-by-Step Setup: There are many detailed YouTube tutorials available that walk you through the process. These will cover everything from installing VirtualBox to configuring the operating system inside your VM.
Prerequisites
Enable Virtualization in BIOS:
Access BIOS during boot (keys vary: F2, F12, Delete, Esc).
Look for "Virtualization," "Vtx," or "Secure Virtual Machine" and enable it.
Disable Windows Features:
Search for Turn Windows Features On or Off.
Disable:
Microsoft Hyper-V
Windows Hypervisor Platform
Windows Subsystem for Linux
Docker Desktop Virtual Machine Platform
Reboot Router (optional, for IP issues):
- Power off PC, reboot router, then restart PC.
Setting Up the Virtual Machine
Open Oracle VirtualBox:
Create VMs for Linux (e.g., CentOS or Ubuntu):
Name: e.g., "CentOS VM."
Type: Linux.
Version: RedHat/Ubuntu 64-bit.
Allocate resources:
RAM: 1–2 GB (adjust based on system RAM).
CPU: 1–2 cores.
Storage: 25 GB (dynamically allocated).
Finish setup.
Install OS:
Download OS ISO file (e.g., CentOS Stream 9).
Attach ISO to VM:
- VM → Settings → Storage → Choose Disk File.
Set Network Adapter to Bridged Adapter (e.g., Wi-Fi).
Power On and Install OS:
Start VM, boot from ISO, and follow prompts:
Language: English.
Installation Destination: Select and confirm virtual hard disk.
Partitioning: Automatic.
Network: Configure bridged adapter and verify IP.
Set Hostname (e.g., "CentOS VM").
Time Zone: Adjust as needed.
Root Password: Create a secure password.
Verification
After Installation:
Once installation is complete, power off the VM via ACPI Shutdown.
Open VM settings → Go to Storage → Remove the disk from the virtual drive → Click OK.
Restart the VM:
Right-click the VM → Power Off → Then start the VM again.
Wait for the VM to boot.
Login:
Enter the username and password set during the installation.
Run the command
ip addr showto get the IP address (e.g.,192.168.1.11).
Access via Git Bash on Host Machine :
Open Git Bash on your local machine.
Use the command
ssh username@<IP address>to connect (e.g.,ssh user@192.168.1.11).Accept the connection by typing "yes" and enter the password.
Basic Commands:
Use
ip addr showto verify the connection.Use
hostnameto check the VM’s hostname.
What is Bridged Networking?
The VM acts as a separate device on the same network as the local machine.
The VM gets its own IP address from the network router, just like the local machine.
The local machine can communicate with the VM using its IP address.
2. Automatic VM Creation using Vagrant
If you're looking for a quicker and simpler approach, automated VM creation might be the way to go. In this method, you create a script (called a Vagrantfile) that defines your VM configuration. Once the script is ready, you can simply run the command vagrant up to automatically create and launch the VM.
Tools Needed:
Vagrant: A tool that automates the VM creation process.
Oracle VirtualBox: As the hypervisor, still required for running the VMs.
With automation, you only need to define your VM setup once, and you can replicate it across multiple machines effortlessly.
How Vagrant Works:
Uses "Boxes" (pre-configured VM images) from Vagrant Cloud.
Automates VM creation and provisioning through a configuration file called
Vagrantfile.Vagrantfile:Configures VM settings like RAM, CPU, and IP addresses.
Includes provisioning commands to set up servers, databases, etc., automatically after the VM boots.
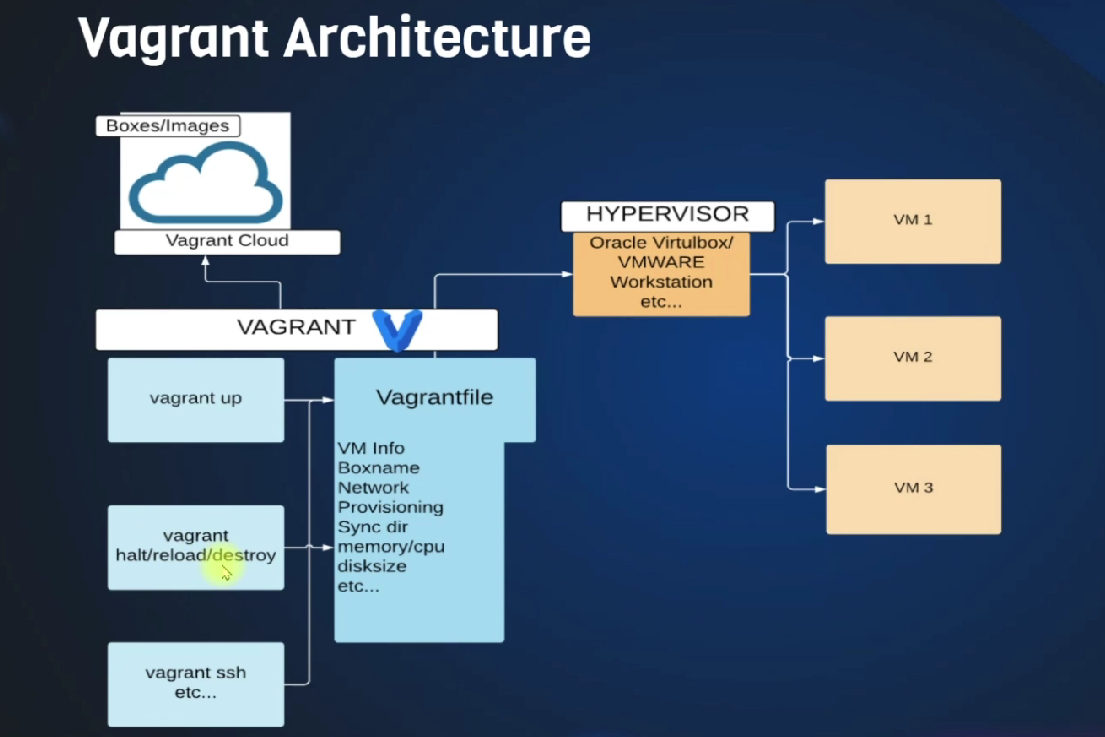
Key Commands:
vagrant init <box_name>: Initialize a Vagrantfile with a specific box.vagrant up: Create and start the VM.vagrant ssh: SSH into the VM.vagrant halt: Power off the VM.vagrant destroy: Delete the VM.
Step by step approach (Windows)
open Git Bash on local machine
make new directory (ex. vagrant-vms) in any drive,
mkdir /c/vagrant-vms
cd /c/vagrant-vms
pwd   #present working directory
ls    #check list of files
mkdir ubuntu  #create new folder in vagrant-vms
ls

cd ubuntu   #go in ubuntu folder
go to vagrant cloud and search for box name for ubuntu VM - https://portal.cloud.hashicorp.com/vagrant/discover/ubuntu/jammy64
copy box name “ubuntu/jammy64” and return to Git Bach
vagrant init ubuntu/jammy64 # Initialize a Vagrantfile
You might face issue in above command. Try after disabling antivirus protection of your system.
When vagrant file is created, start VM using vagrant up
 vagrant up   # start VM on virtual Box
 vagrant box list  #shows all boxed created
 vagrant status  # show status of VM
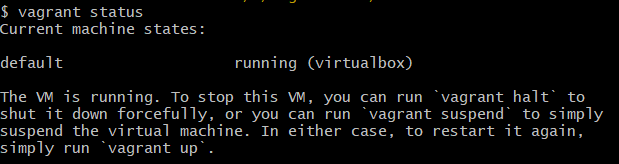
You can Open Oracle Virtual Box to check if VM is running or not.
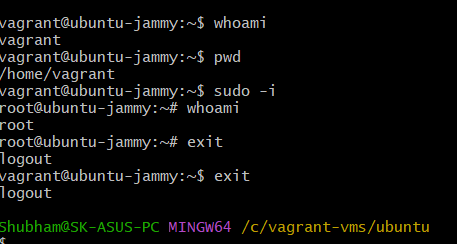
Login to VM from Git Bash of local machine
vagrant sshNow you accessed VM’s SSH
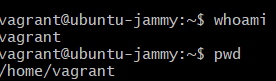
To switch from vagrant user to root user — >sudo -i
exit from root user— exit from vagrant user
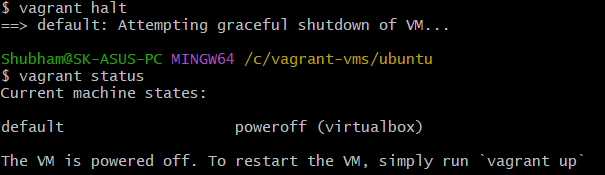
Power off VM—> vagrant halt
To upgrade VM—> vagrant reload
To Delete VM—> vagrant destroy
Create new VM —> vagrant up
To see status of VM in local folder—> vagrant status
To see status of all VMs on local machine—> vagrant global-status
Note: Before shutting down your system, always make sure that VMs on system are also powered off
- To see all executed commands—> history
Summery
Virtualization is a key technology in DevOps and cloud computing, allowing for the abstraction of physical resources into virtual instances through hypervisors. This improves resource utilization, scalability, and flexibility by enabling multiple operating systems to run on a single machine. There are various types of virtualization, including server, network, storage, and desktop. Before virtualization, resources were often underutilized and costly to manage. Hypervisors are categorized into Type 1 (bare metal) and Type 2 (hosted) based on how they interact with physical hardware. The article also compares dual boot setups with VirtualBox, a Type 2 hypervisor, and provides step-by-step methods for creating virtual machines both manually and automatically using Vagrant.


